reMarkable microSD
This page discusses how I added a microSD card to my reMarkable tablet. I did this because I want to develop software for my rM without wearing out the internal eMMC. I chose an external card because I want to be able to swap them easily; it also makes backups faster.
Contents
Opening the Case
The aluminum back panel is held to the plastic case with glue. I have not yet determined what melts this glue, or how to “properly” take the back off. I was able to lift it off, by starting slowly in a corner. Thereafter, I used a putty knife to slowly peel it away. The panel bent, but I was able to bend it mostly-flat again.
Next, there is a magnesium chassis screwed to the plastic case. Underneath the rubber feet are six silver screws. There are also XX black screws, that must be removed.
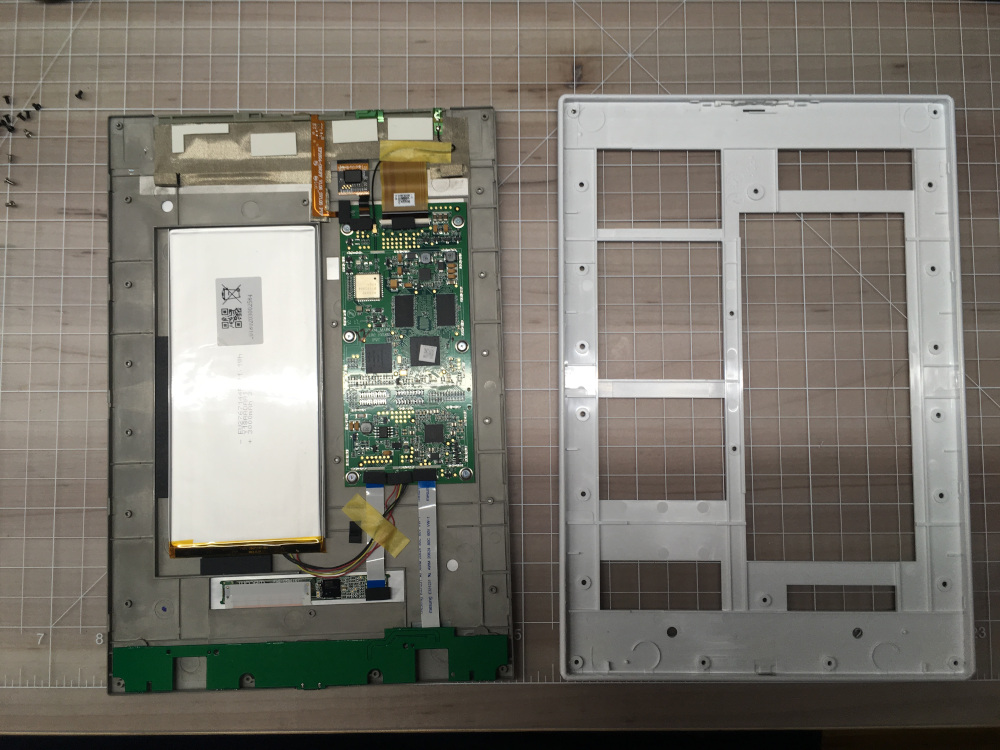
The epaper display is glued to the magnesium chassis; don’t try to pull it apart. There is also a white silicone-like substance around the edge of the epaper panel, which seems to disintegrate and flake off. I think it fills the gap, and perhaps offers a little waterproofing. This is non-replaceable. The screen can be pushed apart from the plastic chassis. It is held on the perimeter with plastic latches, so split it with a spudger and go slowly.
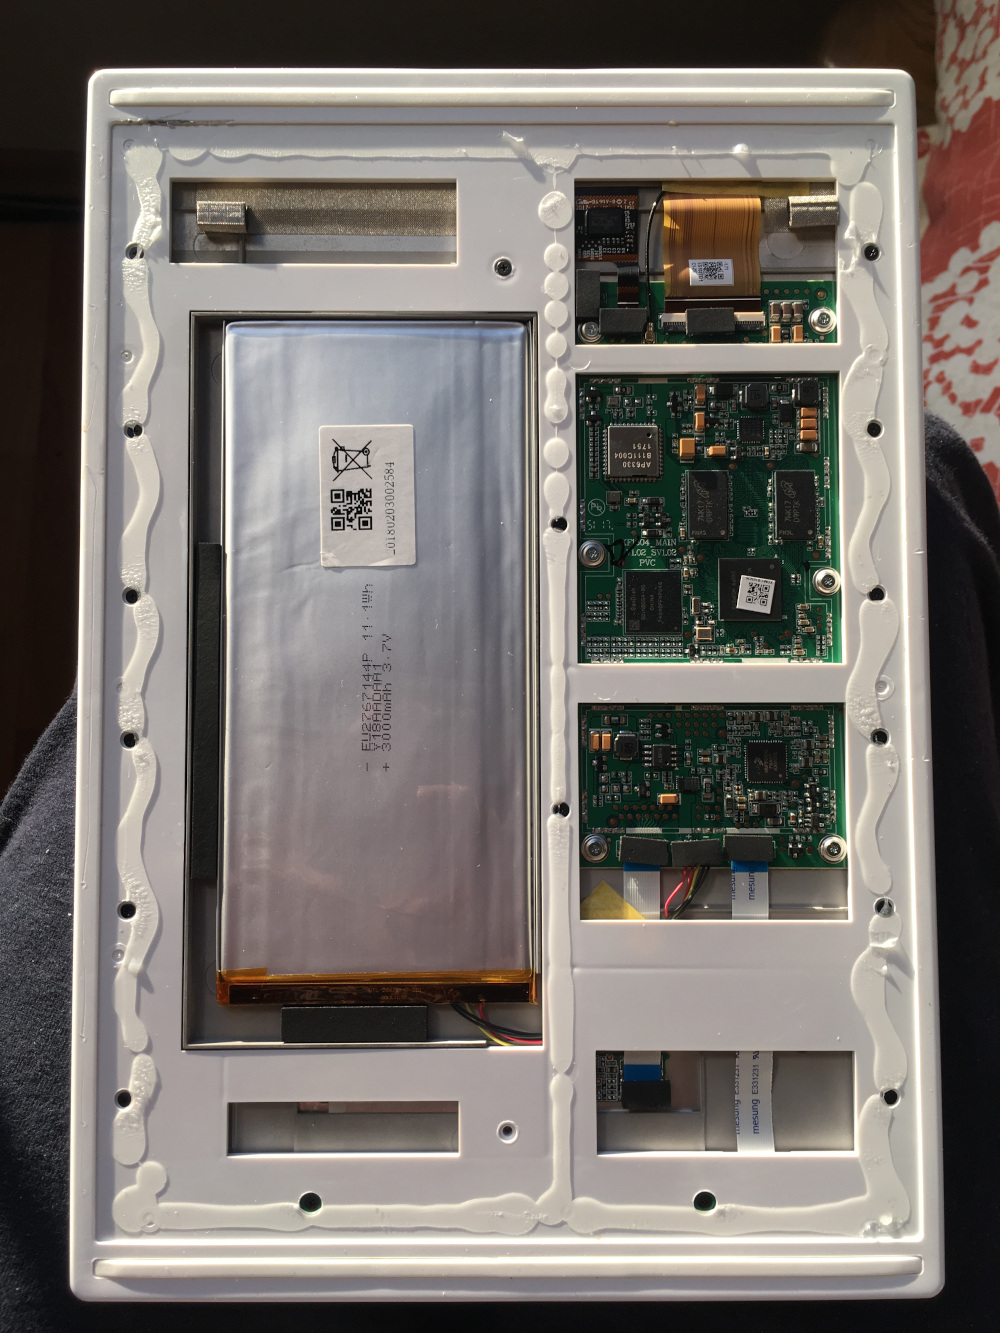
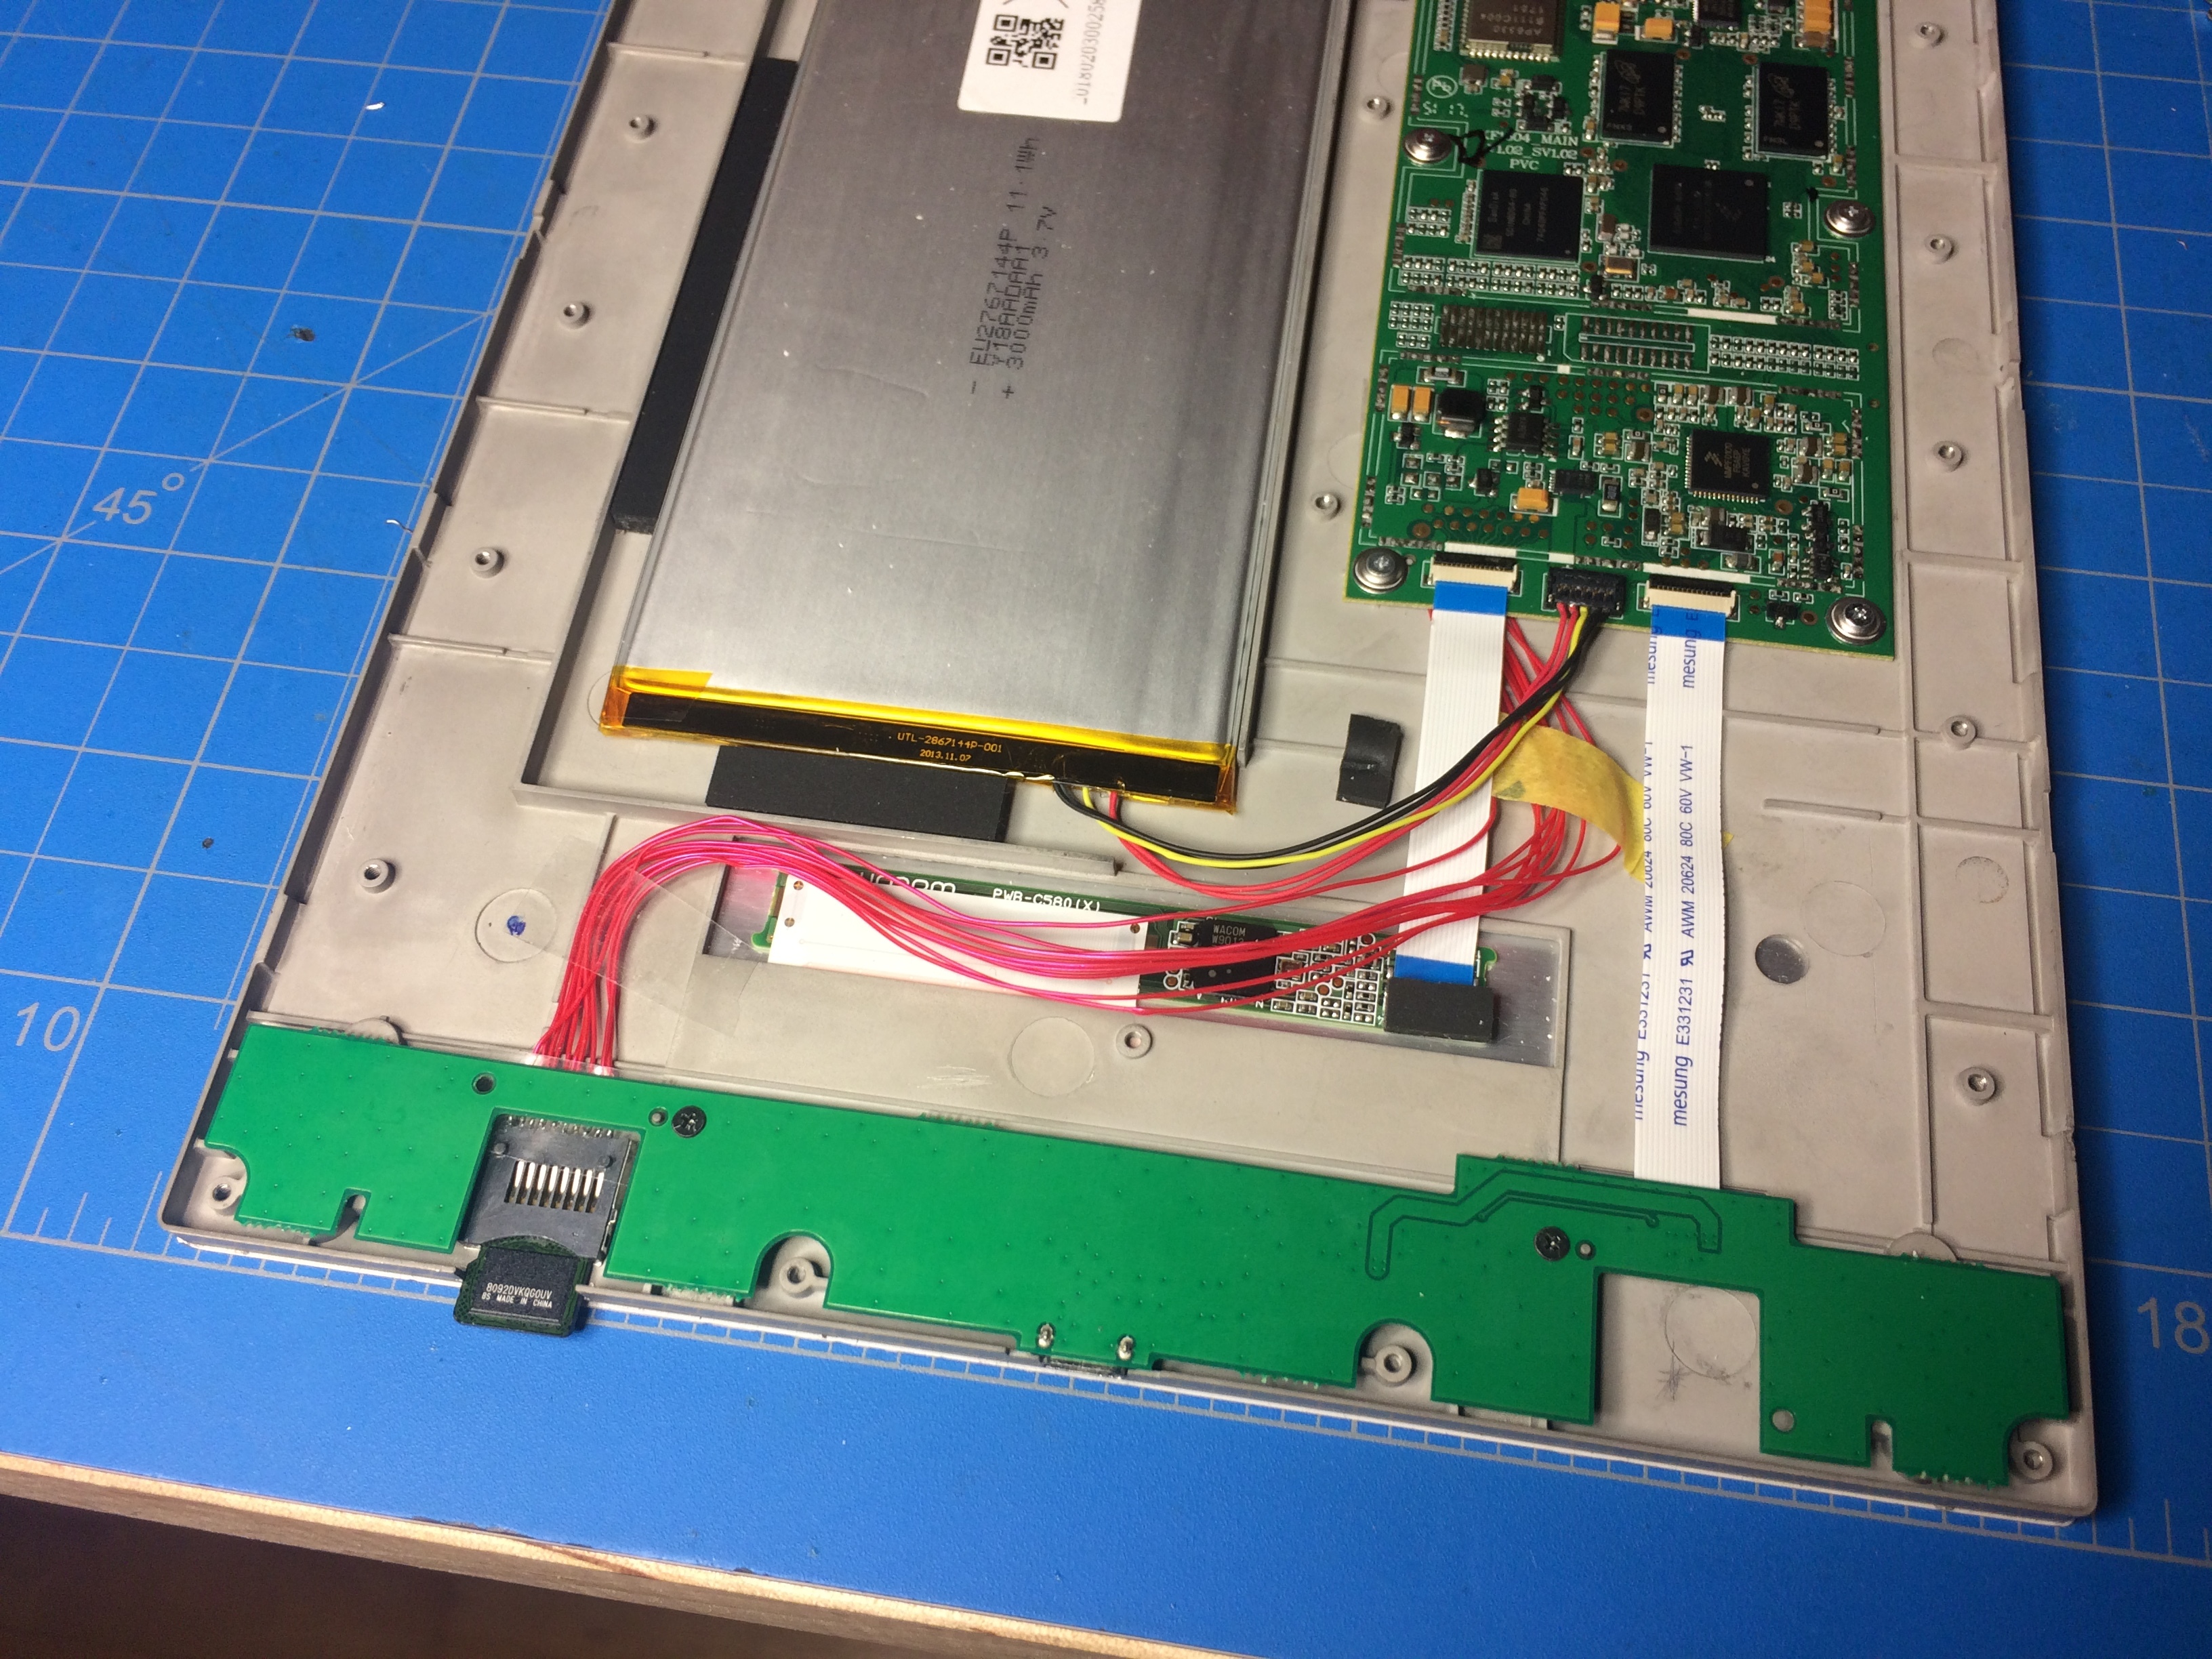
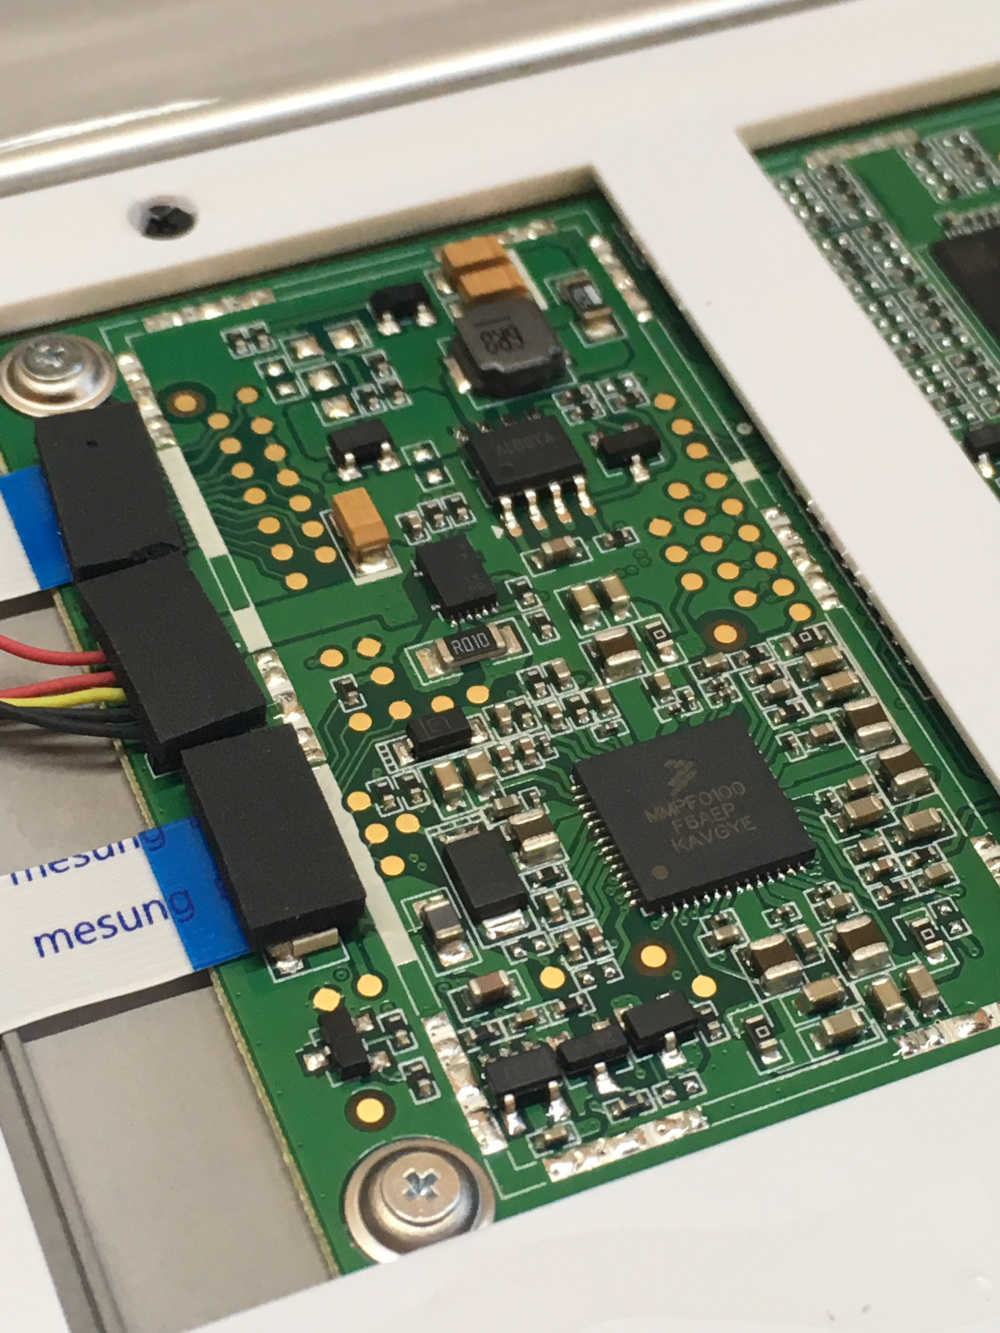
With the case off, the guts can be removed. There are five connectors to the logic board. In clockwise order starting at top-left: power button, touch panel, antenna, epaper display, USB daughterboard and buttons, and Wacom digitizer.
Finally, the logic board can be removed. It is held with six small screws and washers. Underneath the logic board is a plastic tape, a section of which must be removed around the SD pads.
Positioning the Card
The bottom-right seemed like an appropriate placement for the card socket, because the area is already spacious. The right side was easier to route the cables to, because of the channels cut in the white plastic case. I reassembled the reMarkable prior to soldering, to ensure no bulges or deformities appered.
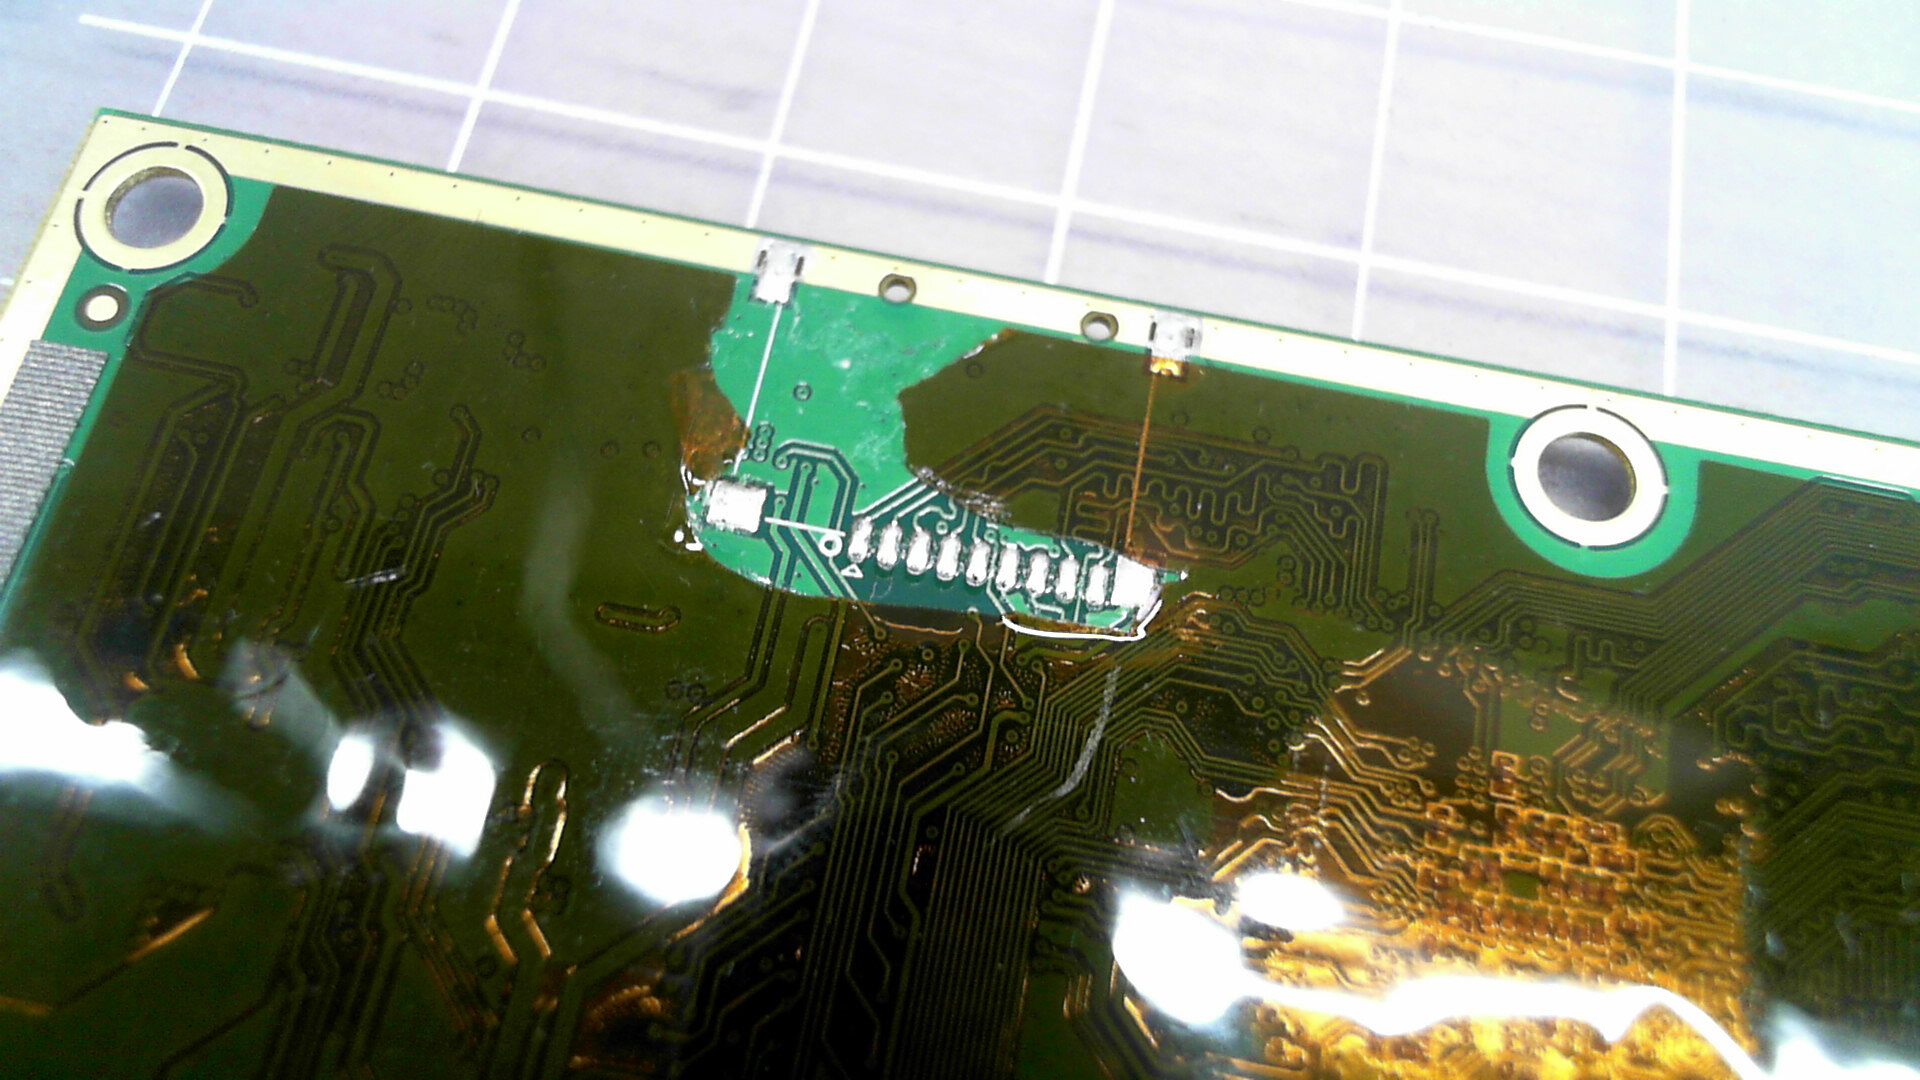
Soldering the Wires
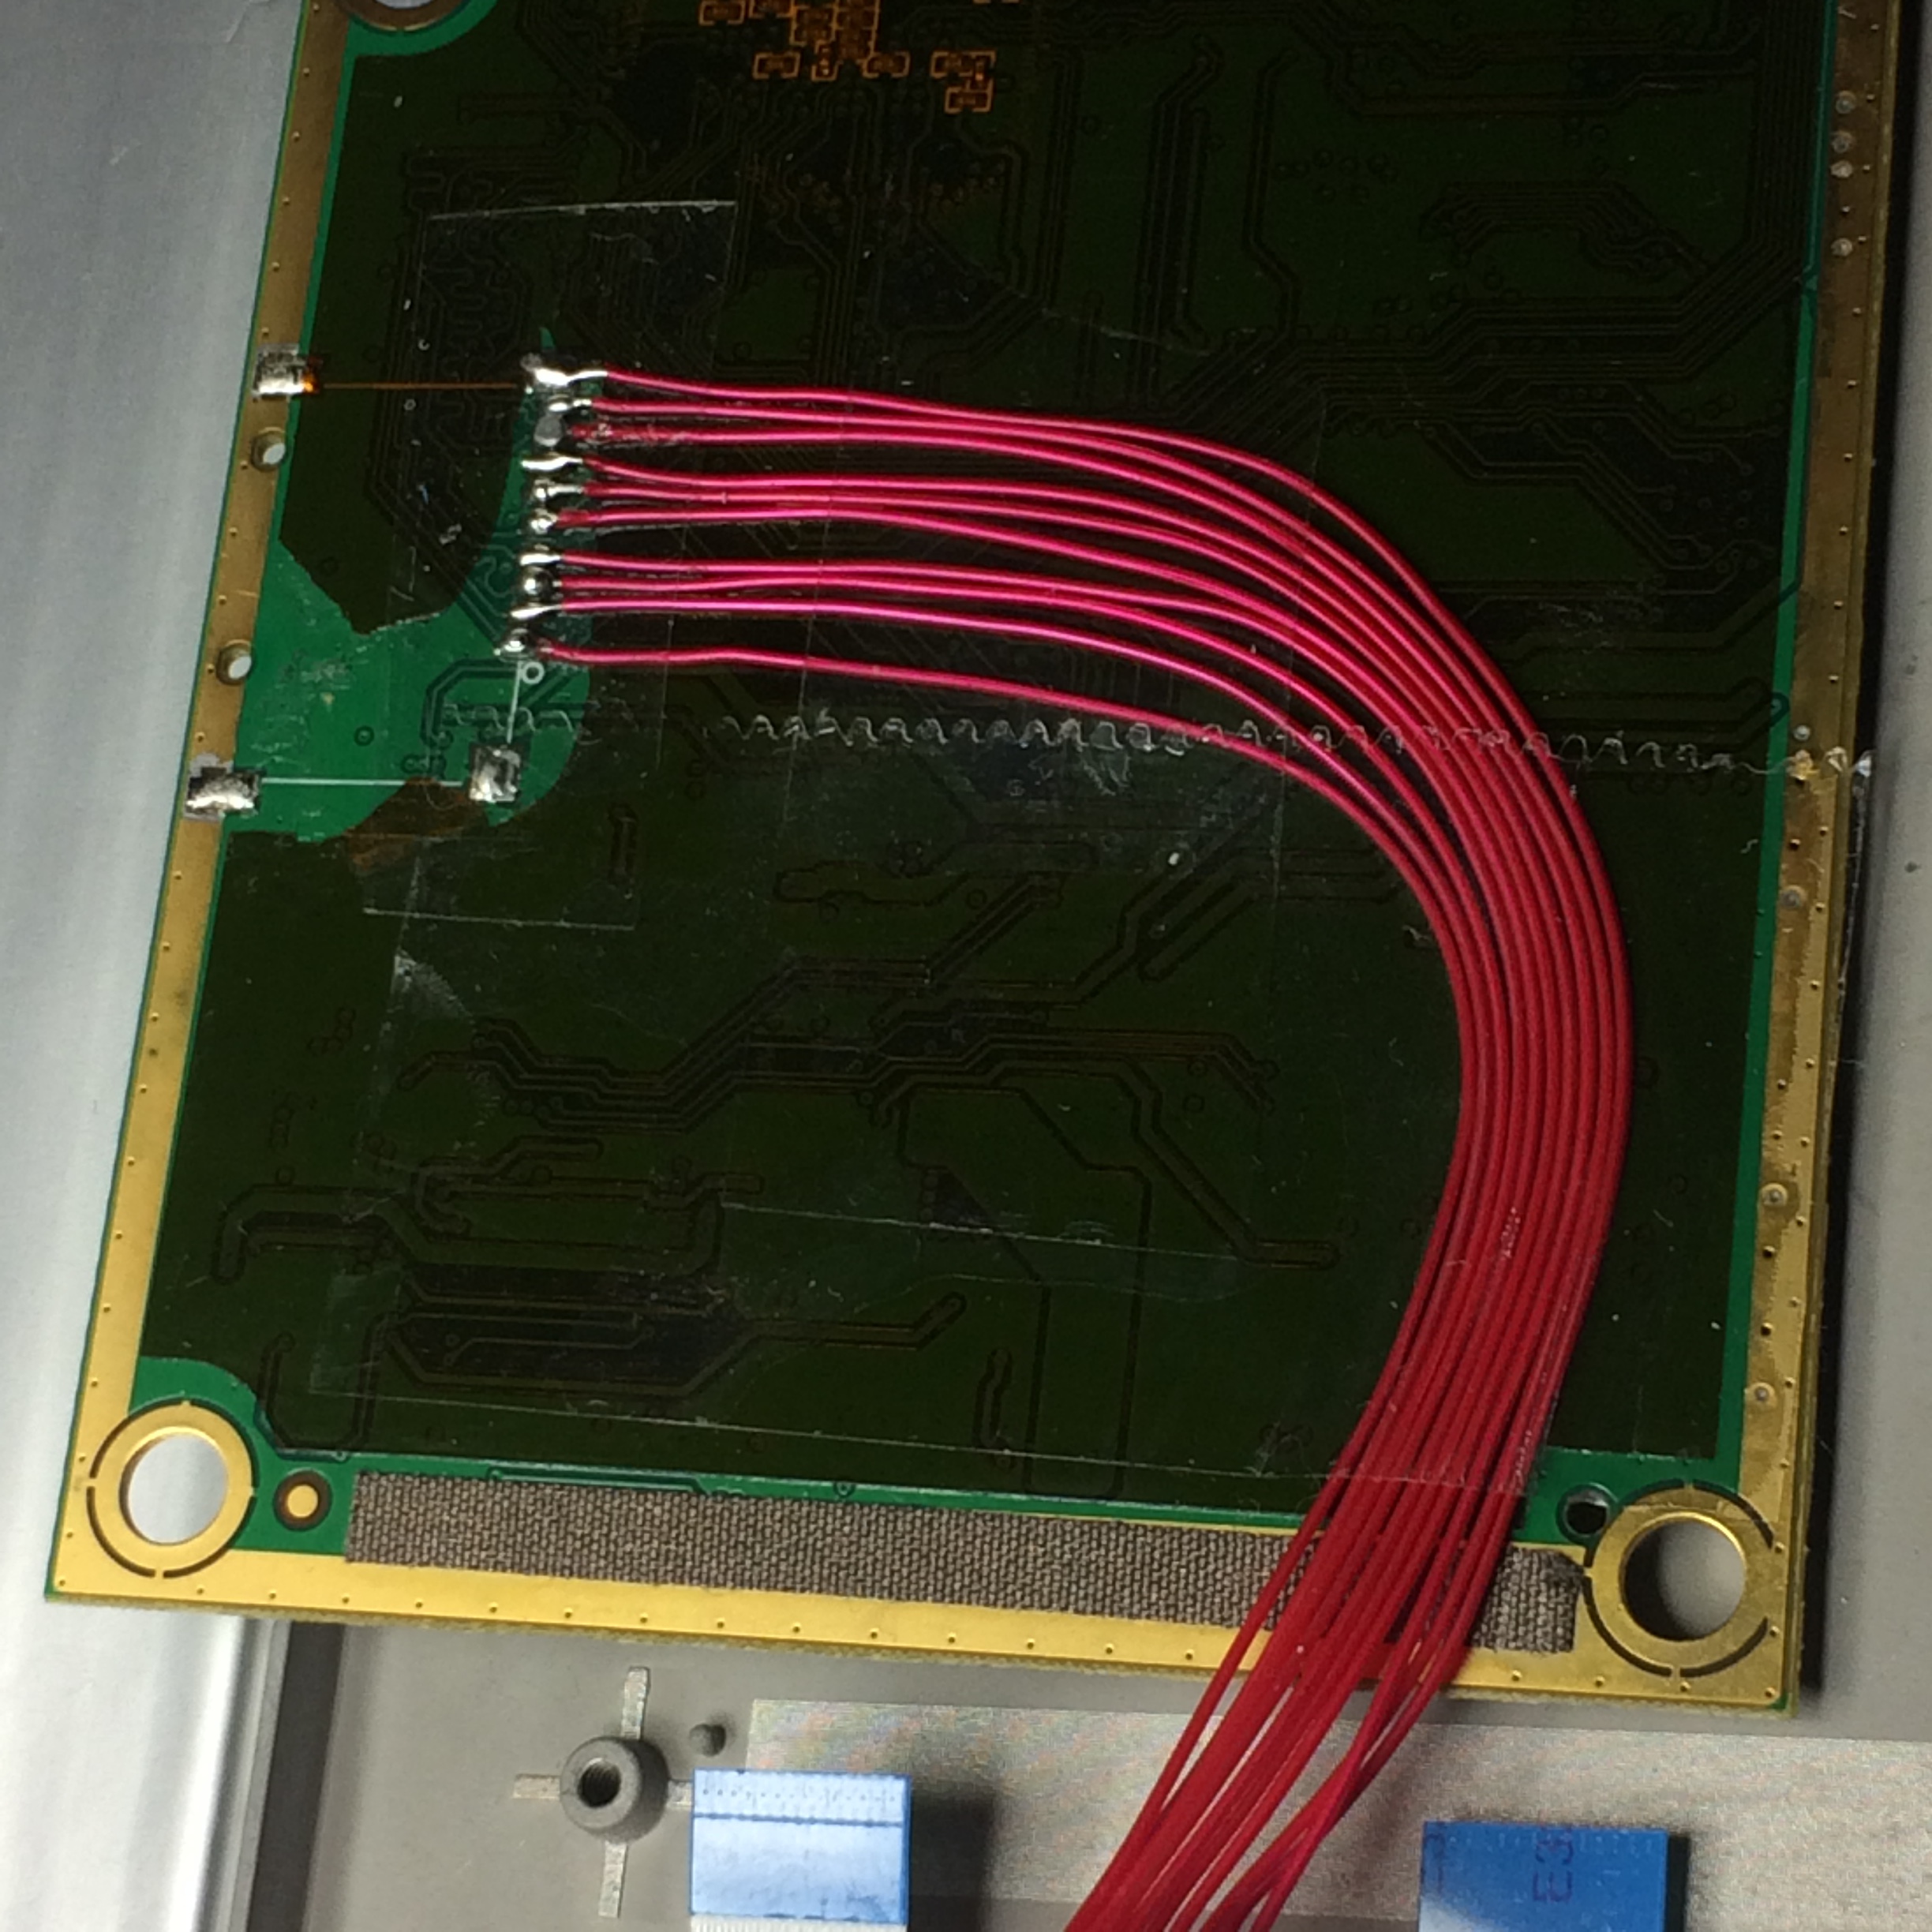
Using ten 30 AWG wires and plenty of flux, I connected the board to the socket. The board indicates which pin is first. The board has a ninth pin, which is used for card-detect. This gets pulled low when a card is inserted.
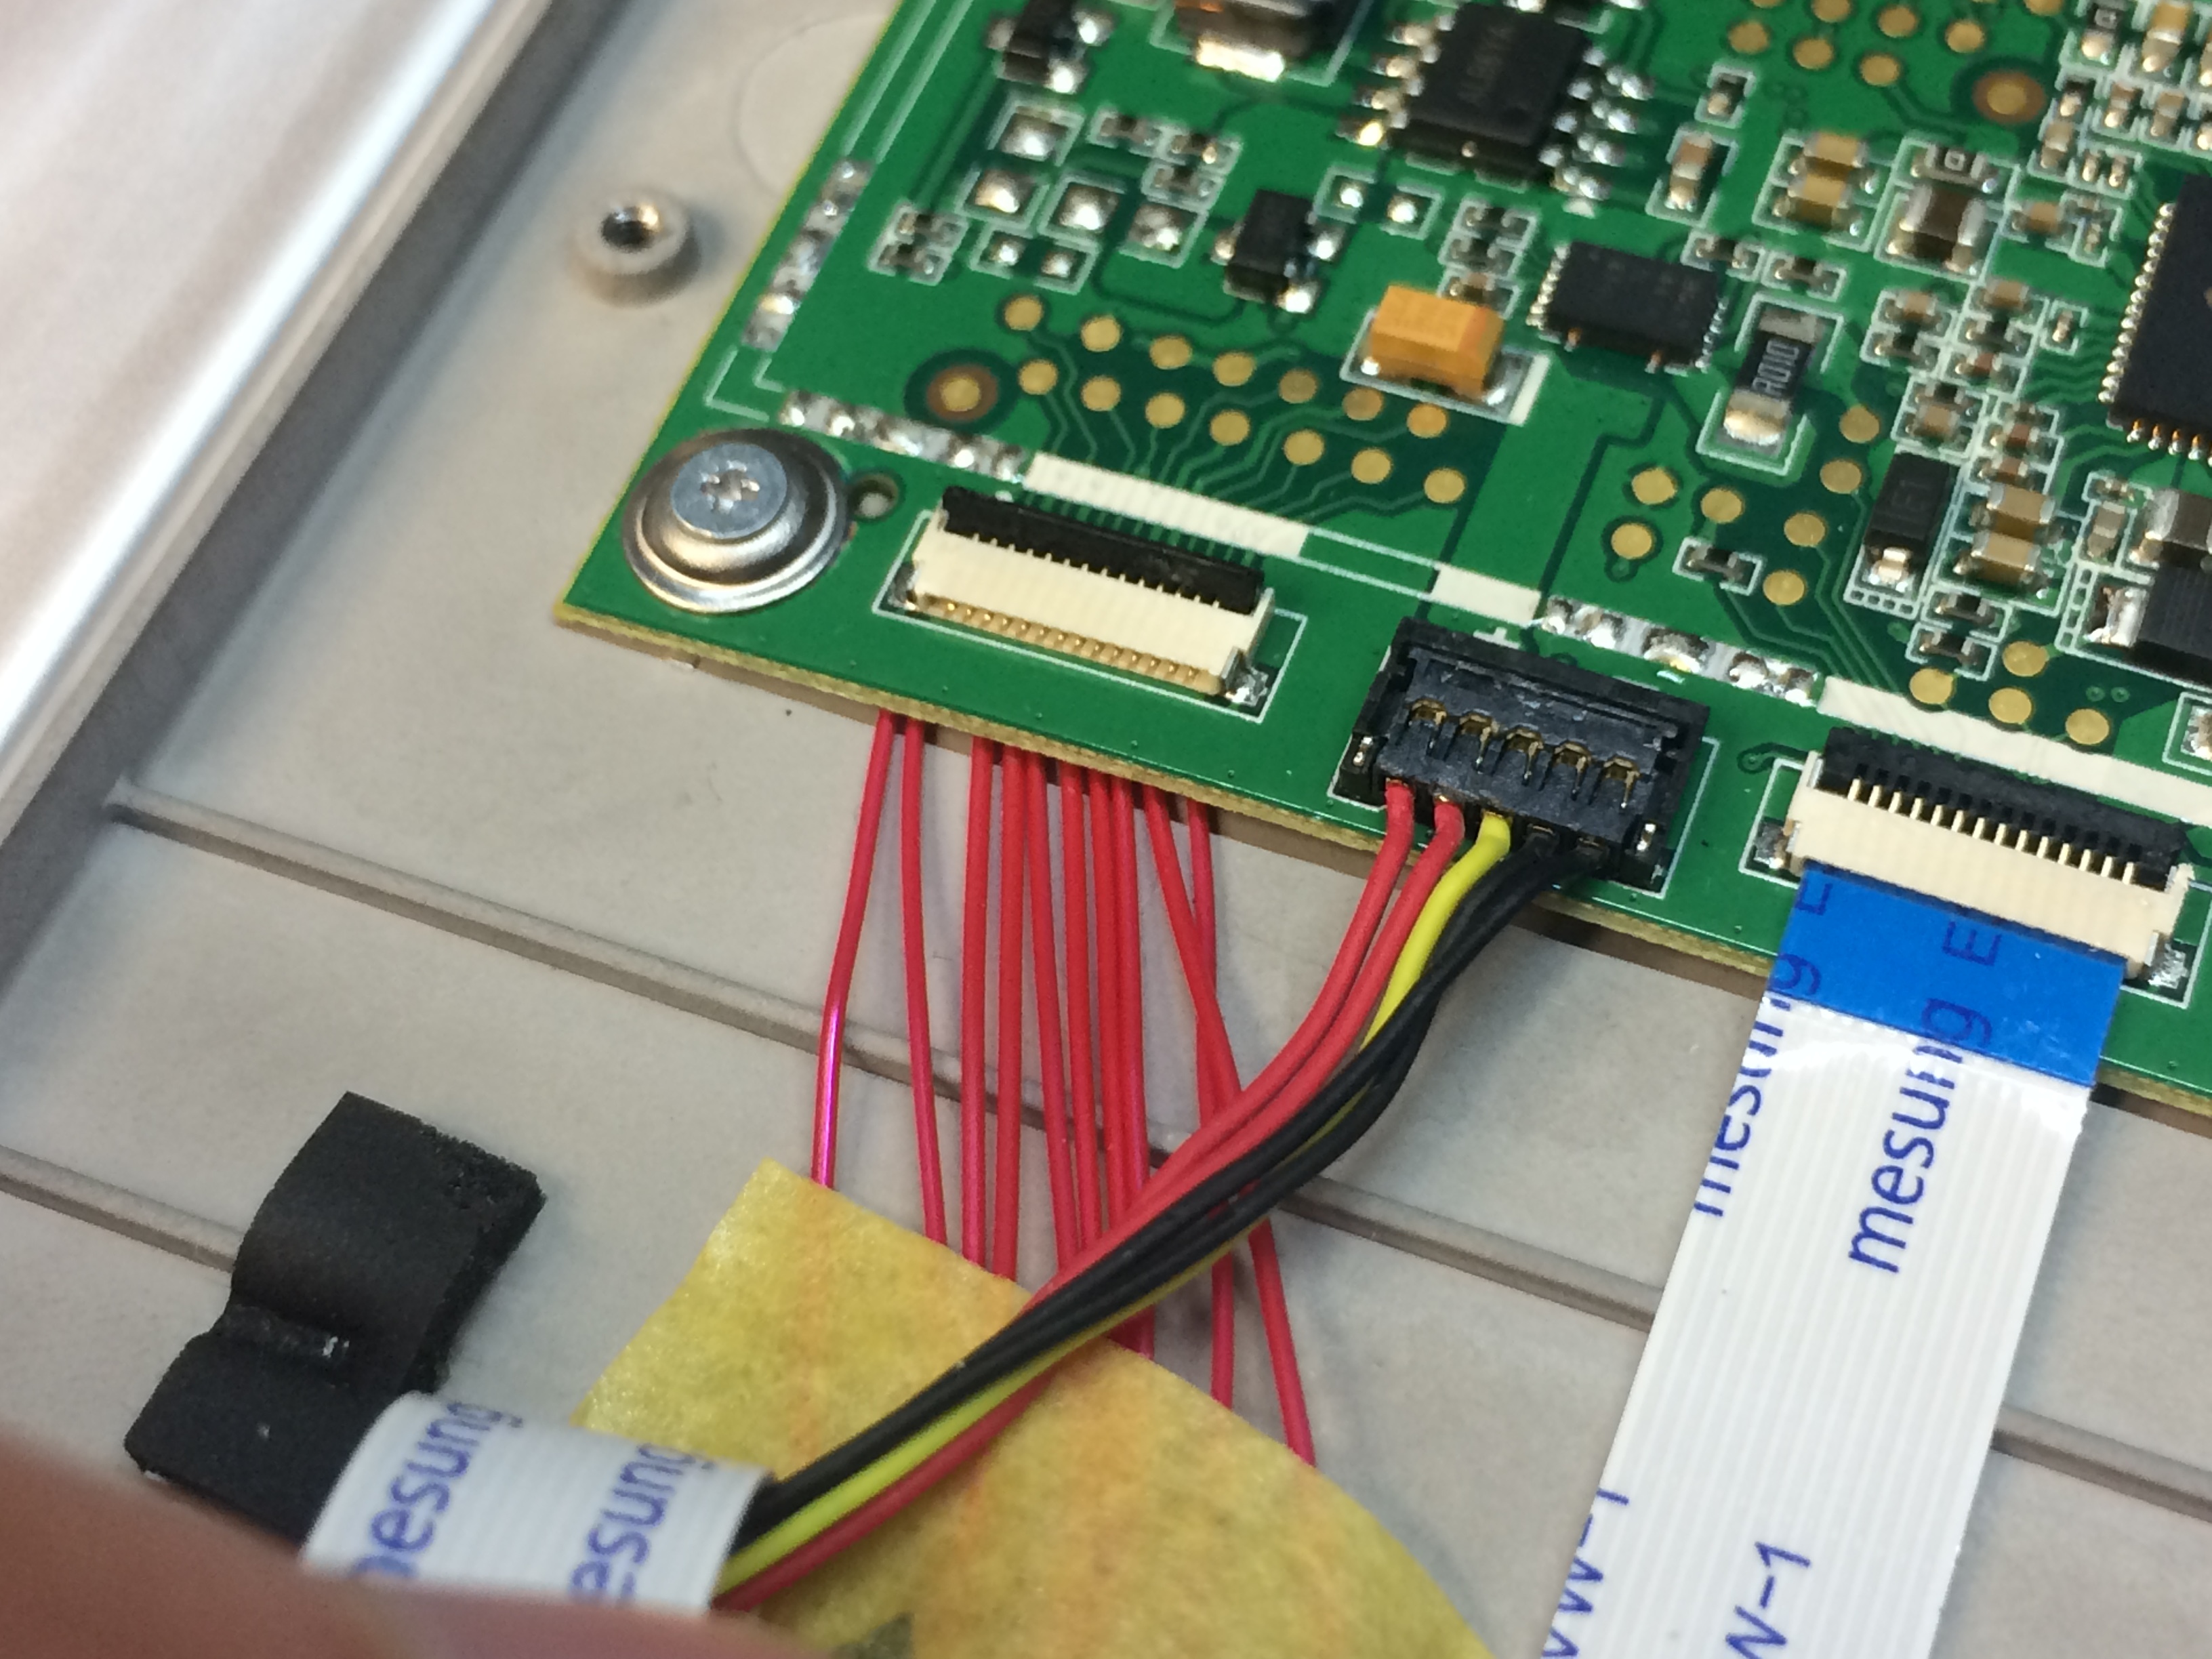
To keep things as flat as possible, I used cellophane tape to mate the
wires to the board. They feed out beneath the digitizer’s FFC cable in
one beautiful ribbon. This also prevents elecrical contact to the grounded chassis.
Cutting the Case
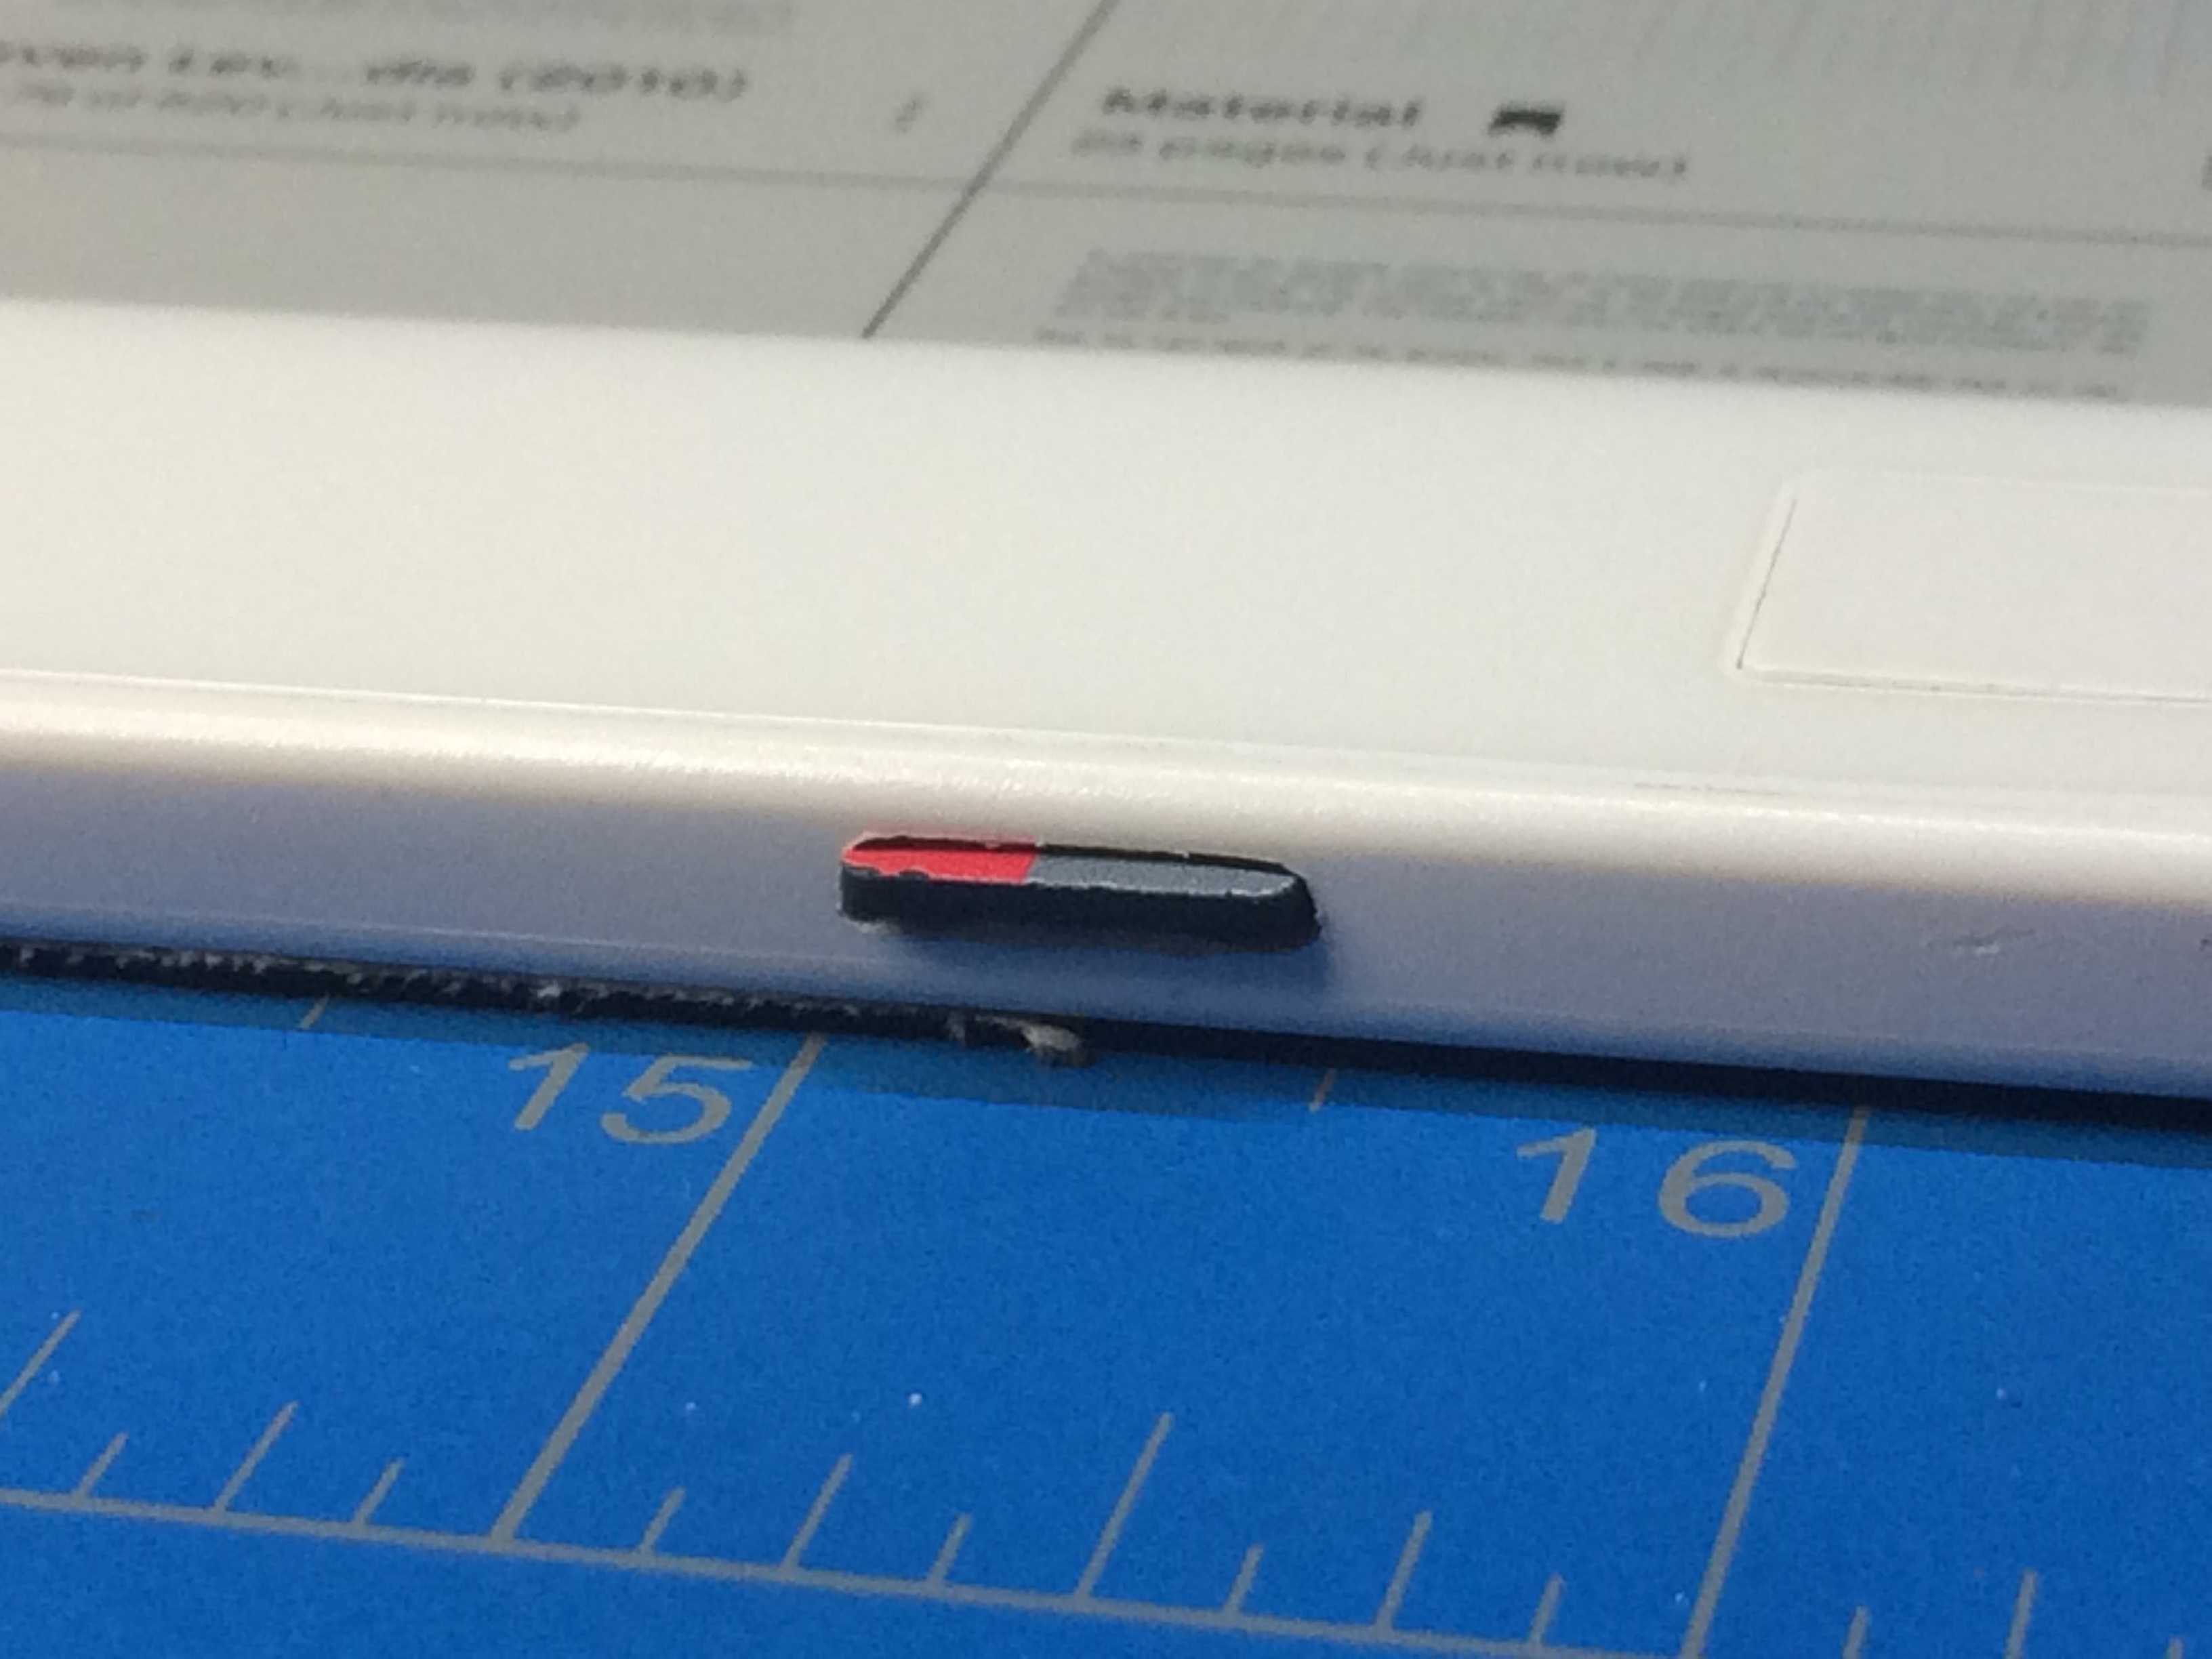
I drilled the SD slot by-hand with a rotary tool. Starting with a carving bit on the inside, I first hollowed out the area to give me a thin veneer, measured with a flashlight. Once I felt it was thin enough, I drilled from the front with a pointy sanding bit, and cut longitudinally.
The magnesium chassis had a small section removed, which was easy with a tiny wire cutter. While it sacrifices a little bit of strength, it makes up for it in storage capacity.
After testing the fit once again, I fillited epoxy around the edge of the socket, gluing it down. I was careful not to get any inside the socket.
Loading the Kernel
The stock rM kernel doesn't enable the SDHC1 slot, which is how these
pins are designated in the device tree file. I recommend first being
comforable with this remarkable-flash guide, the NXP porting guide for the i.MX6 processor, and the i.MX Yocto user guide.
The rM is a mostly-vanilla i.MX6 board (many share similaries, including the Hobbitboard).
As such, it shares the same SDHC interface. What the microSD slot
connects to, and what the stock kernel does not activate, is the SDHC1
interface. This can be enabled in the device tree, and the kernel may be
recompiled to include support for an SD card.
By default, the sdhc1 interface is disabled in the device tree. Enabling
this is the first step. Copy the
arch/arm/boot/dts/zero-gravitas-factory.dts over
arch/arm/boot/dts/zero-gravitas.dts. Then, edit it to enable the sdhc1
interface like shown in the diff below.
 &usdhc1 {
        pinctrl-names = "default", "state_100mhz", "state_200mhz";
        pinctrl-0 = <&pinctrl_usdhc1>;
        pinctrl-1 = <&pinctrl_usdhc1_100mhz>;
        pinctrl-2 = <&pinctrl_usdhc1_200mhz>;
        bus-width = <4>;
        cd-gpios = <&gpio4 7 GPIO_ACTIVE_LOW>;
        disable-wp;
        wp-controller;
        keep-power-in-suspend;
        enable-sdio-wakeup;
        no-1-8-v;
        /*disable-wp;*/
-       status = "disabled";
+       status = "okay";
 };
Next, make zero-gravitas_defconfig and edit the .config file produced to include the following drivers.
CONFIG_CFG80211=y
CONFIG_MAC80211=y
CONFIG_BRCMUTIL=y
CONFIG_BRCMFMAC=y
CONFIG_RTL_CARDS=y
CONFIG_BATTERY_BQ27XXX=y
CONFIG_BATTERY_BQ27XXX_I2C=y
CONFIG_USB_ACM=y
CONFIG_USB_F_ACM=y
CONFIG_USB_U_SERIAL=y
CONFIG_USB_CDC_COMPOSITE=y
CONFIG_CRYPTO_AEAD=y
CONFIG_CRYPTO_GF128MUL=y
CONFIG_CRYPTO_NULL=y
CONFIG_CRYPTO_CCM=y
CONFIG_CRYPTO_GCM=y
CONFIG_CRYPTO_SEQIV=y
CONFIG_CRYPTO_CTR=y
CONFIG_CRYPTO_GHASH=y
CONFIG_CRYPTO_ARC4=y
Once done, rebuild the Linux kernel with make. Copy the artifacts to the rM's /boot directory: arch/arm/boot/dts/zero-gravitas.dtb and arch/arm/boot/zImage. I have included my artifacts here for posterity, but it is foolish to install a kernel that someone else compiled.
Reboot the rM, to make sure xochitl still runs. Then, check dmesg | grep
‘mmc0’ to ensure the card was detected, and double-check it with fdisk
-l. Partition your card as you like, then change the /etc/fstab option
to mount that partition at /home.
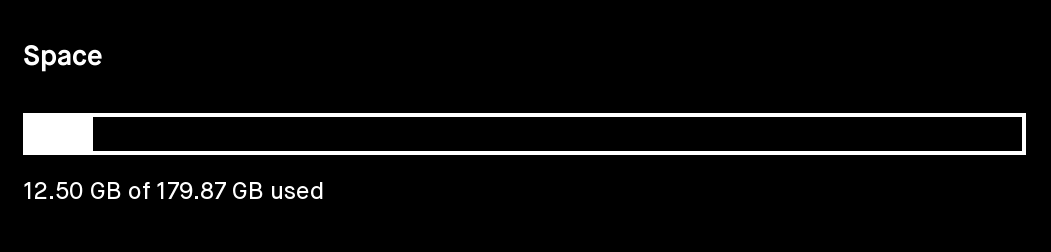
root@reMarkable:~# dmesg | grep mmc0
[    2.091218] mmc0: SDHCI controller on 2190000.usdhc [2190000.usdhc] using DMA
[    2.377570] mmc0: new high speed SDXC card at address aaaa
[    2.391939] mmcblk0: mmc0:aaaa SC200 183 GiB
#/dev/mmcblk1p7 /home auto defaults,nofail 1 2
/dev/mmcblk0p7 /home auto defaults,nofail 1 2
Reboot, and bask in the increased storage capacity.
Ending Notes
- Now, the aluminum back is held on with gaffer tape. I am afraid to glue it shut, in case I want to access the guts again.
- Maybe the white stuff that came out around the bezel can be replaced with calk
- I wish I had used multicolor wires, because it was difficult following them with my eyes.
- I didn’t cut close enough to the top of the plastic case, and so my SD slot is taller than it needs to be, but it isn't very noticable. I shimmed the extra vertical space with a folded up business card for a tighter fit.
- Before using solid-core wirewrap wire, I tried making my own ribbon cable with magenet wire and masking tape. This didn’t work well, because the enamel was hard to remove from just the ends, and the masking tape was too thick. The wirewrap wire turned out much nicer.
- Technically, I think the IMX needs to be changed too (and re-wrote over /dev/mmcblk1boot0) but I didn’t do this, and it seems to work alright. I'm fine using it just for the data partition so my OS updates work.
More Images
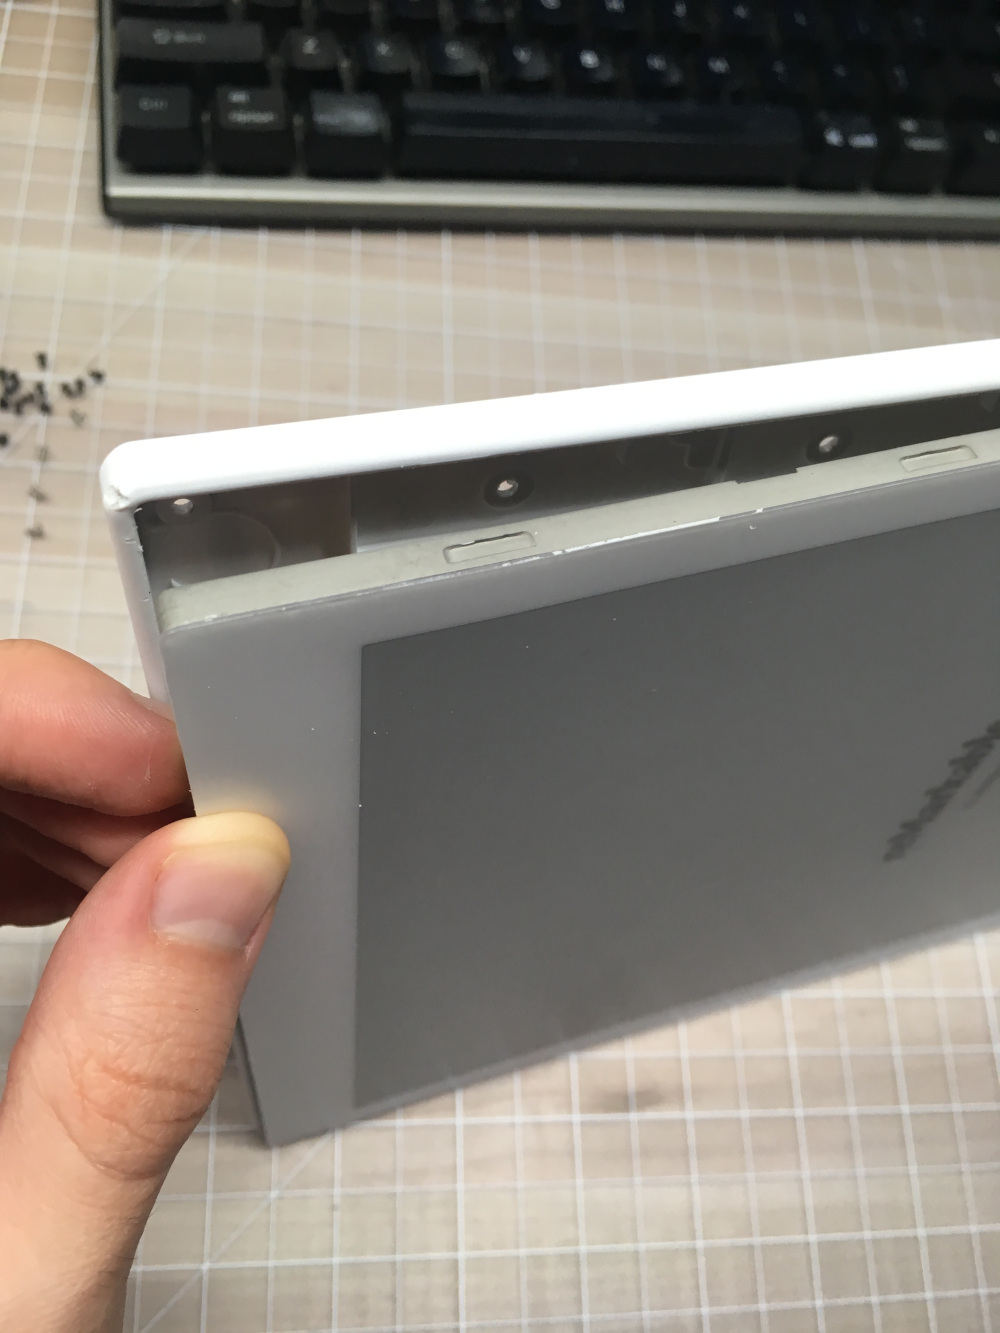
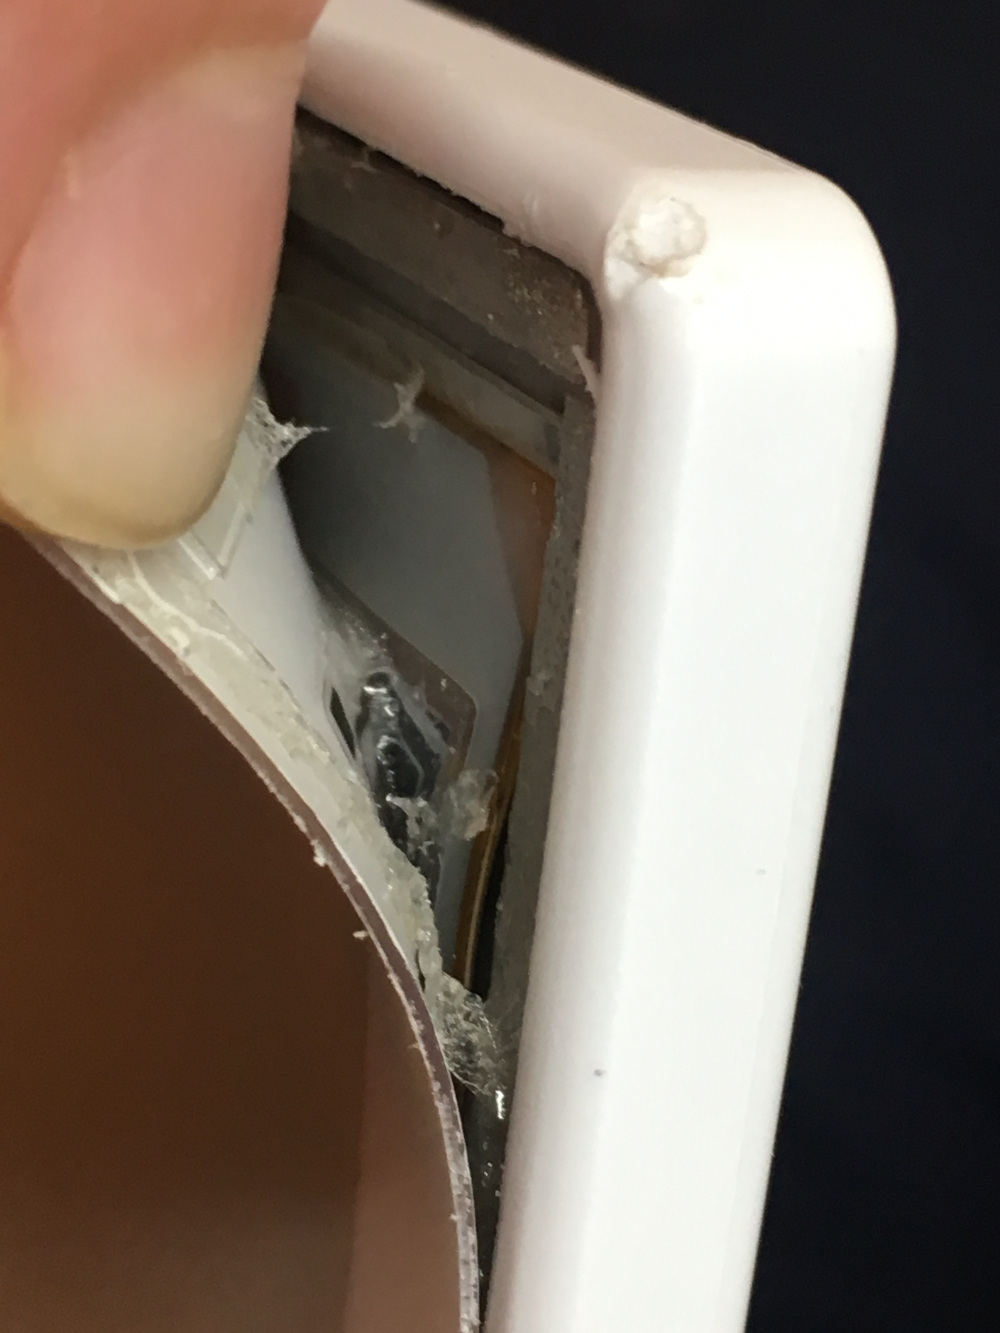
Don't peel the screen off!